Using Swift and AVFoundation to create a custom camera view for an iOS app


Capturing images in iOS
When you want take a photo with your iOS device, there are two ways to go about it. The image picker controller is an out-of-the-box solution for capturing photos and videos. It is easy to set up, but does not provide a very flexible experience. The alternative is to create a custom capture user interface with the AVFoundation library. However, using the AVFoundation requires each component be configured and connected.
This post explains how to use the AVFoundation components in a simple photo app. It should be enough to get you started if you want to use a custom camera in your app.
Project Setup
Create a single view application with Swift as the programming language and select iPhone for the device. In the project settings, in the Deployment Info section, find the Device Orientation subsection and make sure only “Portrait” is checked. That avoids the complications of the device rotating for now.
Storyboard Elements
Open the storyboard and add an image view, a view, and a button labeled “Take photo”. The size and positioning doesn’t matter too much. Just make sure things fit on the screen and don’t overlap. On the image view, select Aspect Fit for the Mode.
Storyboard and View Controller Connections
Create outlets in your view controller for the view and image view, and add an action for the button.
@IBOutlet weak var capturedImage: UIImageView!
@IBOutlet weak var previewView: UIView!
@IBAction func didPressTakePhoto(sender: UIButton) {
}
Member Variables
Add three member variables, which will be explained later.
var captureSession: AVCaptureSession?
var stillImageOutput: AVCaptureStillImageOutput?
var previewLayer: AVCaptureVideoPreviewLayer?
Now that you have the stage set, you can begin configuring and hooking up the components.
Capture Session
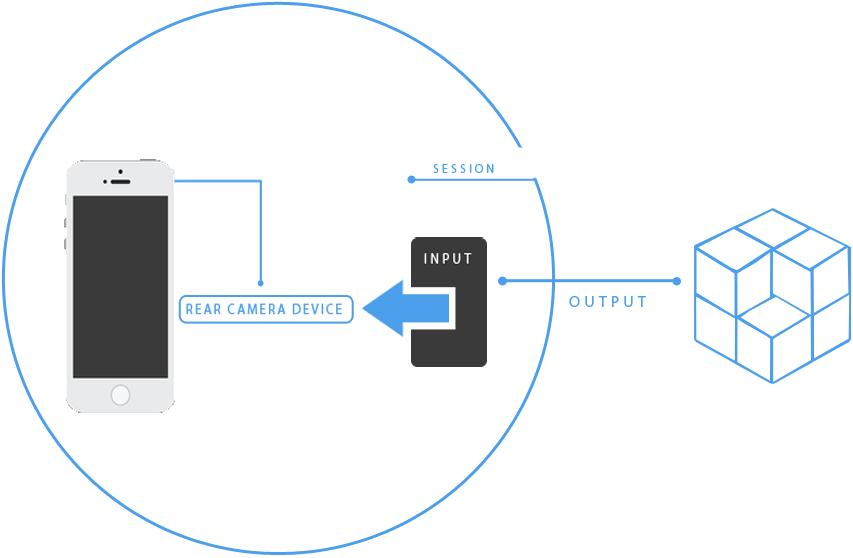
The first component to consider is the capture session. The capture session combines the input and output and data stream for a particular purpose. In this example, you want to capture a still image, so you will need a capture session that combines input from the camera and outputs it in a still image format.
In your viewWillAppear function you will set your capture session:
captureSession = AVCaptureSession()
captureSession!.sessionPreset = AVCaptureSessionPresetPhoto
The first line creates the object while the second line uses a session preset to configure the session. Session presets determine the quality level of the capture. In this case, you are using a setting for high resolution still photo capture.
Input Device
Once you have the session configured, you select a device to use. You want to use the rear camera on the iPhone. Since the rear camera happens to be the default device for photo and video capture, you can use the defaultDeviceWithMediaType function.
var backCamera = AVCaptureDevice.defaultDeviceWithMediaType(AVMediaTypeVideo)

Now that you have the device selected, you have to prepare to accept input on that device. You do that by instantiating an instance of AVCaptureDeviceInput, passing the device you selected to the initializer.
var error: NSError?
var input = AVCaptureDeviceInput(device: backCamera, error: &error)

Before you created the input object, you simply had reference to a device. The capture device input allows the device to be associated with a capture session. And associating the input with the session is what you do next:
if error == nil && captureSession!.canAddInput(input) {
captureSession!.addInput(input)
…
}
Output Configuration
With input in place, the output needs to be set. Setting up the output involves specifying the data format. For simple photo capture, you will use JPEG.
stillImageOutput = AVCaptureStillImageOutput()
stillImageOutput.outputSettings = [AVVideoCodecKey: AVVideoCodecJPEG]
Then the output can be associated with the capture session:
captureSession!.addOutput(stillImageOutput)
Capture Preparations
Your session is now configured and can start. However there are still a few pieces needed to create a usable camera.
1. A live preview of what the camera lens is going to capture
2. The code that does the capture after the Take photo button is pressed
3. The code to make the image view display the picture that was captured
Live Preview
When you are using a camera on a smart phone, you expect to see a live preview as you move the camera around. This simulates what you see when looking through an old school camera viewfinder. What you might not have realized is this live preview requires a video feed set up in your code. The AVFoundation makes it simple with the AVCaptureVideoPreviewLayer class.
previewLayer = AVCaptureVideoPreviewLayer(session: captureSession)
previewView.layer.addSublayer(previewLayer)
The first line above creates the previewLayer object and connects it with your capture session. The second line adds the video preview layer as a sublayer to the view placed on the storyboard. Then in viewDidAppear I set the bounds of the video preview layer to match the bounds of the containing view.
previewLayer!.frame = previewView.bounds
Using the previewView as the placeholder allows you to use the storyboard to visually specify a size and position the video preview layer, rather than having to add dimensions and coordinates in the code.
Data Connection
In order to capture a photo from the camera, you need to get the connection object that was created when you set up the input and output on the capture session.
if let videoConnection = stillImageOutput!.connectionWithMediaType(AVMediaTypeVideo) {
…
}
In the code above, which is in the take photo button press action, the connectionWithMediaType function returns the first connection in the array of connections on the stillImageOutput. You set up the stillImageOutput object in the viewWillAppear function.
Photo Capture
Now that you have a connection object that has data flowing from our desired input to our desired output it is time to make a capture.
stillImageOutput?.captureStillImageAsynchronouslyFromConnection(videoConnection, completionHandler: {(sampleBuffer, error) in
…
})
The captureStillImageAsynchronouslyFromConnection function asynchronously calls it’s completion handler with the captured data in the sampleBuffer object. That data is represents the captured image and could be used in a variety of ways. But for this sample application you need to transform the data into a format acceptable for display in a UIImageView:
var imageData = AVCaptureStillImageOutput.jpegStillImageNSDataRepresentation(sampleBuffer)
var dataProvider = CGDataProviderCreateWithCFData(imageData)
var cgImageRef = CGImageCreateWithJPEGDataProvider(dataProvider, nil, true, kCGRenderingIntentDefault)
var image = UIImage(CGImage: cgImageRef, scale: 1.0, orientation: UIImageOrientation.Right)
The above code takes the output which was in JPEG format and creates a data provider with it. The data provider is then used to create a core graphics image, which is then used to create a UIImage object. The UIImage can finally be assigned to the image property of our UIImageView:
self.capturedImage.image = image
Instead of showing the image, you could save the file to the camera roll or send it to a cloud storage service. Those are all easily achieved with the UIImage object.
Summary
That should give you an idea of how to start with custom image capture. Here is the full code of the example, which you can use as you like:
From here you can add even more advanced features. The sample code provided by Apple can be a guide.

umair
9 years ago
good job
Cody Reisdorf
9 years ago
I’ve followed several camera tutorials lately and I think this gave me the best idea of how to gain fine control over it. But I noticed it still doesn’t save the image to the camera roll (which has been the case for all the other camera tutorials I’ve found so far too). But I finally found a line on Stack Overflow that does the trick when I put it in your didPressTakePhoto method:
UIImageWriteToSavedPhotosAlbum(image, nil, nil, nil)
http://stackoverflow.com/questions/11131050/how-can-i-save-an-image-to-the-camera-roll